Founded in 2016 in the rugged wilderness of Bonners Ferry, Idaho, Überleben (German for “to survive” or “to live well”) emerged onto the scene with a simple mission: to rekindle our connection to fire and the outdoors. Their breakout product was the original Stöker flatpack twig stove. It’s a minimalist marvel that offers a no-fuss, fuel-free way to cook in the wild, using nothing but twigs, bark, and pinecones. It was compact, durable, and refreshingly analog in a world of canister stoves and gimmicks.
Überleben: From Sparks to a Flame
Überleben has grown from a niche bushcraft brand into a respected name in modern firecraft. They’ve expanded their lineup to include thoughtfully designed gear, such as the Zünden and Hexå ferro rods (featuring their proprietary Sånft-kōrr ferrocerium blend), the Kessel bush pot, and the Tindår fire-starting kits. Each product reflects its core values: it embraces simplicity, showcases durability, and honors tradition while remaining open to the future.
Advertisement — Continue Reading Below
They reached a major milestone when they relocated production of the Stöker to the U.S., reinforcing their commitment to quality and local craftsmanship. They also refined the stove’s design, featuring a thicker baseplate and improved airflow. Additionally, it includes a stainless steel grill grate, all without compromising its pack-flat portability.
Today, Überleben continues to thrive by staying true to its roots: creating gear that not only withstands the elements but also helps you succeed in them. Whether you’re boiling water on a mountaintop or sipping coffee from a kuksa by the fire, their tools are built to last and to remind you why you ventured out in the first place.
The Stökers Technical Side
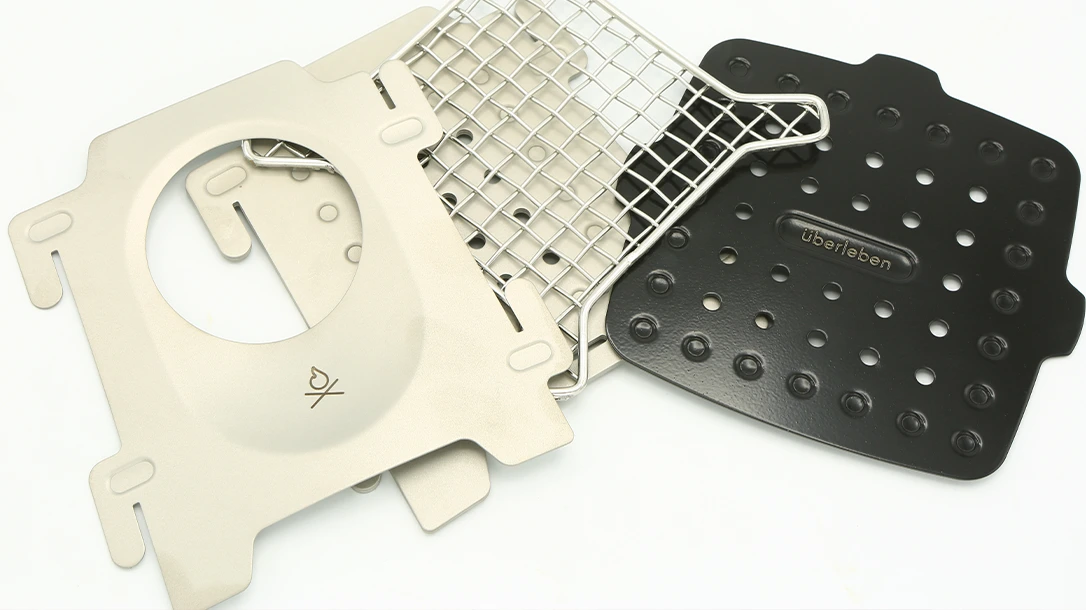
The Überleben Stöker Stove is a flatpack stove that can burn organic matter, such as twigs, pine cones, and moss. Überleben designed it to be compact, lightweight, durable, and easy to assemble. It measures 6 inches x 6 inches x 0.5 inches and weighs 18-20 ounces when packed in the sleeve.
Advertisement — Continue Reading Below
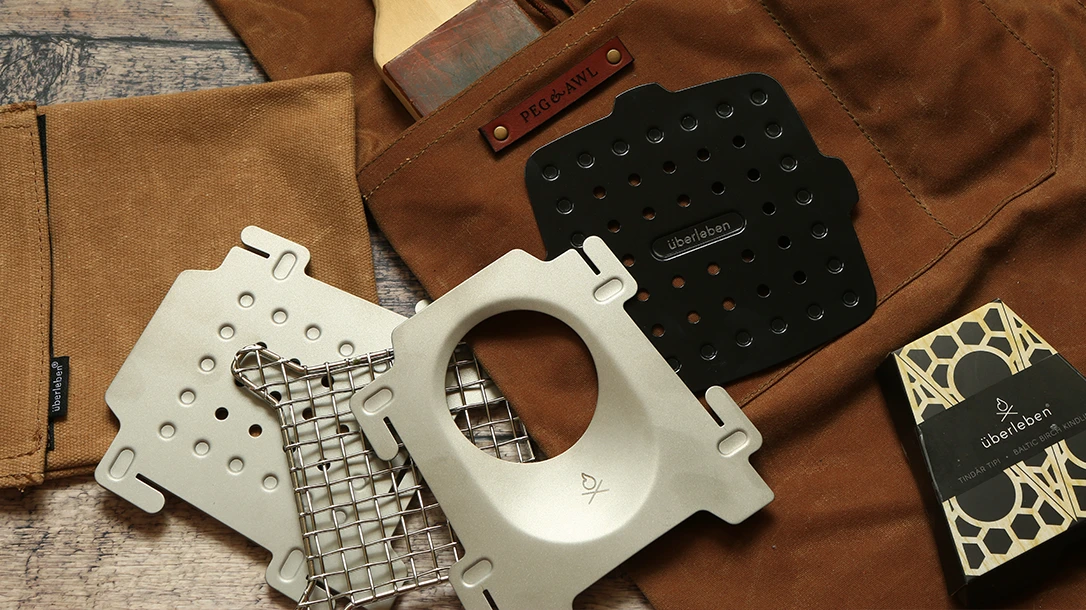
The stove has two metal options: food-grade and anti-corrosive, stainless steel or titanium. The stove also includes a durable waxed canvas sleeve that can be used as an on-demand foraging pouch.
The new version of the Stöker Stove has some differences from the old one. The latest version features a stainless steel grill grate that provides stability and a practical cooking surface. It also has a thicker baseplate that can withstand higher heat and less warping. The new version’s panels feature a redesigned structure that reduces airflow, enhances windbreak, and extends fuel longevity. The new version also features premium finishes that enhance the stove’s aesthetic appeal.
The original Stöker Stove lacked a grill grate, a thick base plate, and premium finishes. It had more airflow, which could make it less efficient in windy conditions. The old version was still a functional and reliable stove. Still, the new version has some improvements that make it more attractive and versatile.
Advertisement — Continue Reading Below
Putting It Together
The latest iteration of the Stöker stove showcases a thoughtfully designed structure featuring five robust panels, complemented by an integrated grill that significantly enhances stability during use. While the assembly pieces lack a numbered system and explicit instructions, the design cleverly guides users in establishing connections. Three of the panels are crafted with a slight bend, making it easy to see how they should align. In contrast, the front panel prominently displays the Stöker logo facing outward to denote its correct position. Additionally, the base plate is designed with the emblem oriented upward, serving as another visual cue. Once these key details are recognized, the assembly process becomes not only more intuitive but also considerably quicker compared to the previous model, allowing users to set up their stove with minimal hassle and maximum efficiency.
Load It
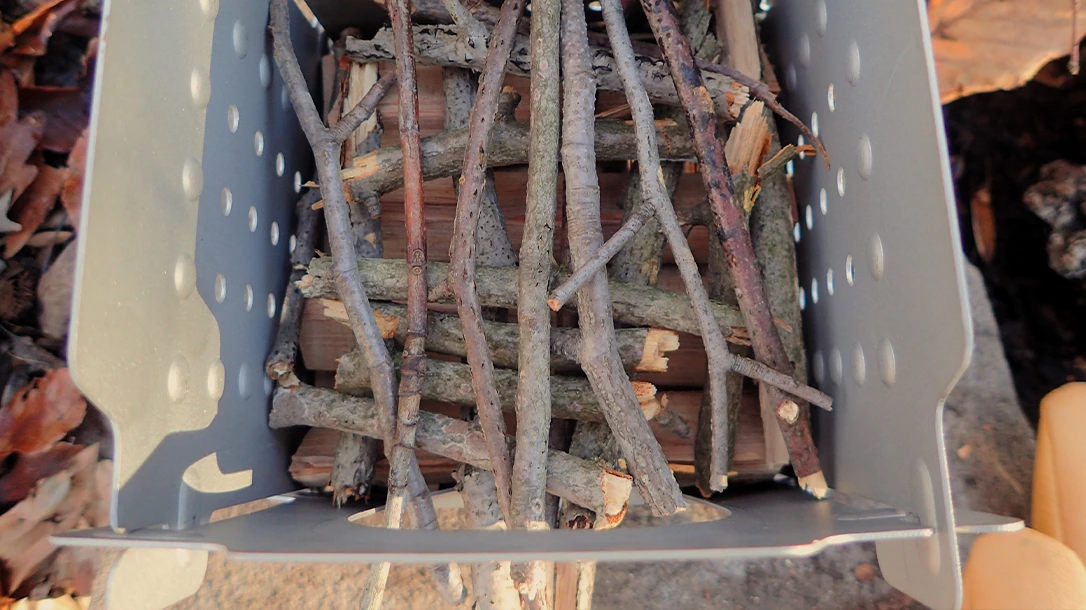
There are no strict rules regarding the loading and ignition of a bio/twig stove. However, I have been using the original Stöker and other DIY stoves for several years and have adopted a top-down burn method. This method takes advantage of the initial high flame to boil water while the fuel burns down, igniting the large wood and helping to establish coals.
Advertisement — Continue Reading Below
I start with thicker hardwood (maple, oak) fuel at the bottom of the stove, arranging them as uniformly as possible. The next layer (above) has slightly thinner sticks perpendicular to the bottom layer. I repeat this method and fill the top 1/3 of the stove with thin twigs (as thin as a toothpick) that are always perpendicular, like a log cabin. At the very top, I put thin feather sticks, shredded poplar bark, dry grass, or cotton balls with Vaseline. The grill stays off during this process.
One way to load the Stöker is to follow a conventional method where you place the tinder at the bottom of the stove. The next layer should consist of thin toothpick-thick shavings or sticks, followed by pencil-thick and finger-thick sticks. You can then add larger hardwood fuel to the top. It’s best to do this process in steps rather than trying to cram everything in at once, just like you would with a traditional fire.
Ignition
No matter what you use to ignite the tinder, the flame will be high initially and burn down to the next layer. This is the best time to hang a kettle or pot of water to boil via a tripod or Burton’s rig. If you place a cooking vessel on top of the initial flame, you risk smothering the flames, so hang it until the fire is sustainable.
Advertisement — Continue Reading Below
Suppose you chose the traditional loading method of Stöker, with the tinder at the bottom and smaller fuel above. In that case, you must ignite the stove via the feeding port. This can take some practice using a Ferro rod. The tinder will usually ignite near the front, so rotating the stove port toward the wind is good to help spread the flame evenly. However, a match, or better yet, the Überleben Tindår Wick, will help ignite multiple areas.
You can always ignite the tinder first, safely place it at the bottom of the stove, and use the stack method to build the fire slowly. It’s all a matter of personal preference and enjoying the fun of experimentation.
Pro Tip: Keep extra tinder and toothpick-thick kindling handy in case you need to rekindle the flames.
Advertisement — Continue Reading Below
Time to Cook
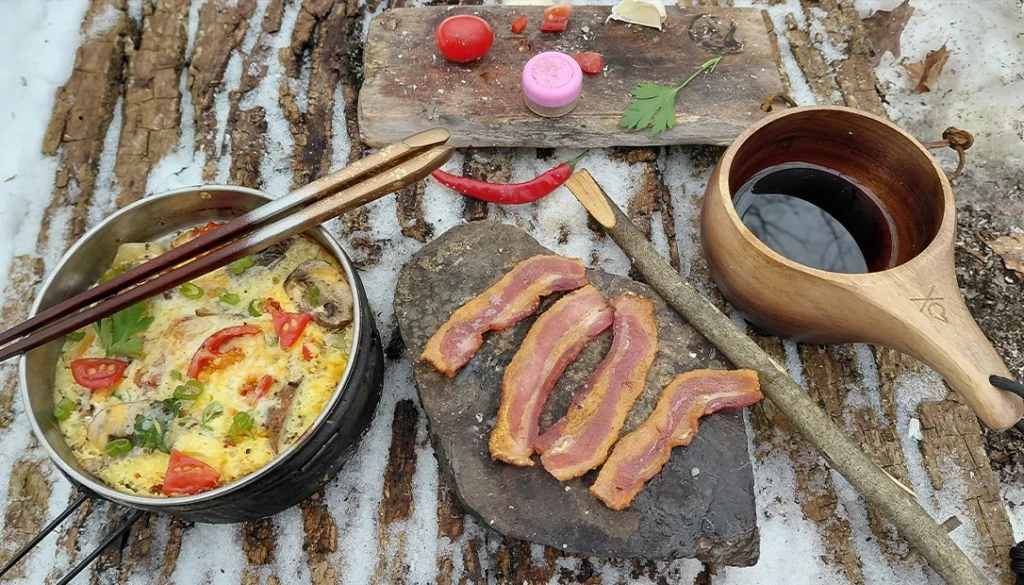
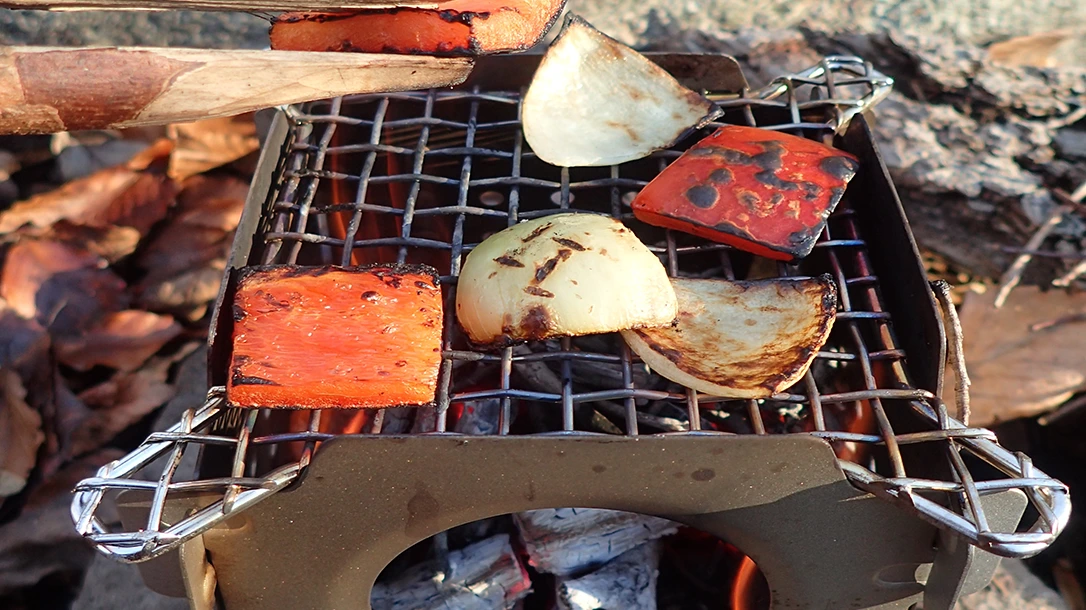
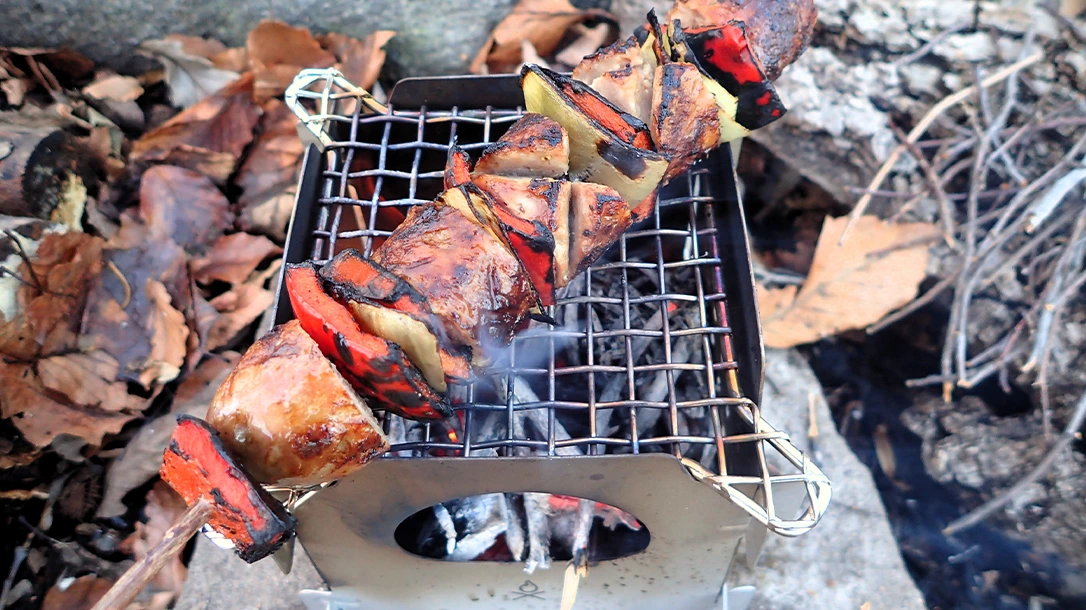
The best part has arrived. Once the initial flames have ignited the fuel and the coals have formed, you can place the grill on top. Use tongs, a spatula, or chopsticks to move food on and off the grill safely. Although the grill and stove are perfectly flat when assembled, the surface on which you are cooking may not be. Be aware that when cooking on the grill, anything that can roll—will.
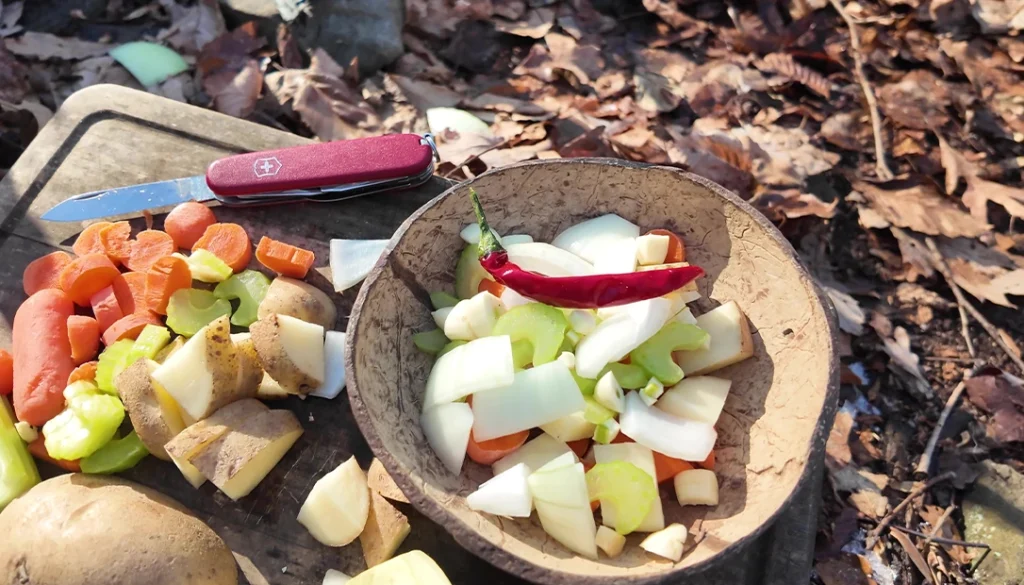
I decided to try out the Stöker grill on one of my all-time favorite camp dishes – Italian sausage, onion, and pepper kabobs. Once the flames had died down and the coals were glowing, I added the grill. With my trusty tongs in hand, I carefully placed the sausages on the grill and watched with satisfaction as the grill marks appeared. When the sausages were cooked to perfection, I added the peppers and onions in two batches, carefully turning them to ensure they were cooked just right, with a little bit of char for that extra flavor.
Advertisement — Continue Reading Below
I noticed how little fuel I added during the cooking process. I’d say the Überleben claim, “The panels of the new version are redesigned to decrease airflow, which provides better windbreak and fuel longevity,” is true. The protruding corners of the grill come in handy when cooking long, cylindrical items, such as hot dogs, crab legs, and kabobs. I can’t wait to try a burger patty next.
The Stöker stove will accommodate most pots and pans of any diameter. Anything narrow, such as a metal cup or a Foster’s-style backpacker’s kettle, will need to be used on the grill. I wouldn’t worry about using cast iron on the Stöker—it can handle it.
Advertisement — Continue Reading Below
Aftermath
This Stöker stove used less fuel and burned evenly and sufficiently in the breezy 35-degree winter weather. Despite the multiple vent holes in the baseplate, I didn’t notice any significant ash under the stove.
The older Stöker would need to cool down significantly before disassembling it, as the metal had warped slightly. I didn’t have any issues putting away the new Stöker, which I did relatively quickly with a pair of heat-resistant leather gloves to see if it differed from the predecessor.
Pro Tip: Use leather gloves when handling a hot Stöker stove.
Culmination
Say goodbye to fuel canisters for good and switch to an organic fuel source made from twigs, pine cones, and moss. With this eco-friendly option, you’ll tread lighter and never have to worry about running out of fuel again. The new era Stöker stove did not disappoint.